Suspension
The Suspension page configures all spring, damper, bump stop, and anti-roll bar components for your vehicle. The suspension is modular — each subsystem is an independent library component that can be saved, loaded, and shared separately.
Component Structure
The suspension system is organized per axle (front and rear), with each axle containing corner components (left and right) and optional shared components.
graph TD
    SUSP["<b>Suspension</b><br/><i>Front + Rear axles</i>"]

    SPR["<b>Springs</b><br/><i>Linear or Torsion Bar</i>"]
    DMP["<b>Dampers</b><br/><i>Damping coefficient</i>"]
    ARB["<b>Anti-Roll Bar</b><br/><i>Roll stiffness</i>"]
    BS["<b>Bump Stops</b><br/><i>Progressive spring + damping</i>"]
    HS["<b>Heave System</b><br/><i>3rd spring, damper, bumpstop</i>"]

    SUSP --> SPR
    SUSP --> DMP
    SUSP --> ARB
    SUSP --> BS
    SUSP --> HS

    style SUSP fill:#6366f1,color:#fff
    style SPR fill:#ef4444,color:#fff
    style DMP fill:#10b981,color:#fff
    style ARB fill:#f59e0b,color:#fff
    style BS fill:#8b5cf6,color:#fff
    style HS fill:#64748b,color:#fff
Not all components are required. ARBs, bump stops, and heave systems are optional and toggled per axle.
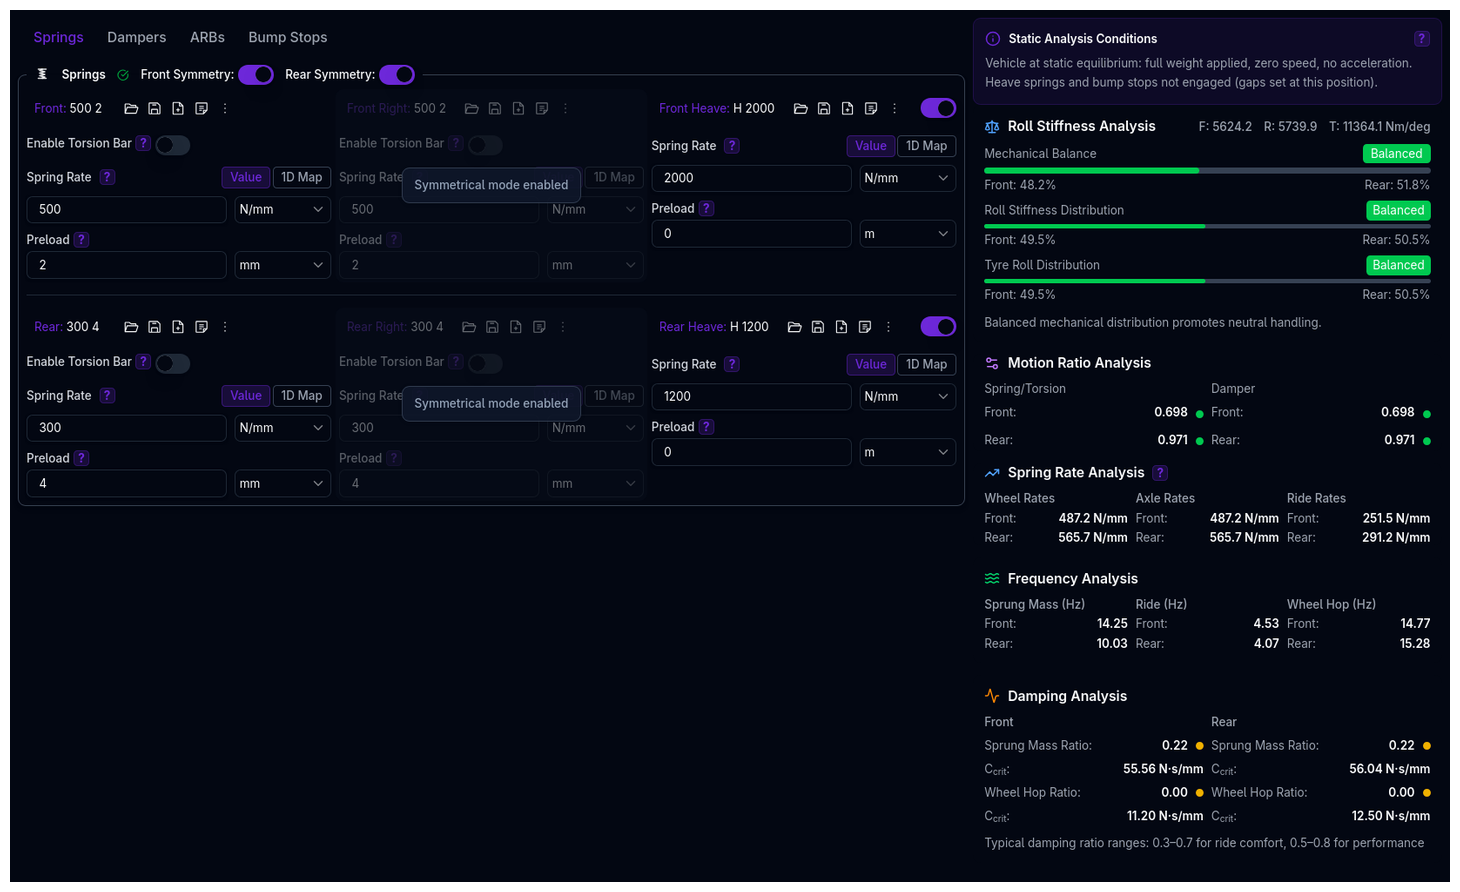
Page Layout
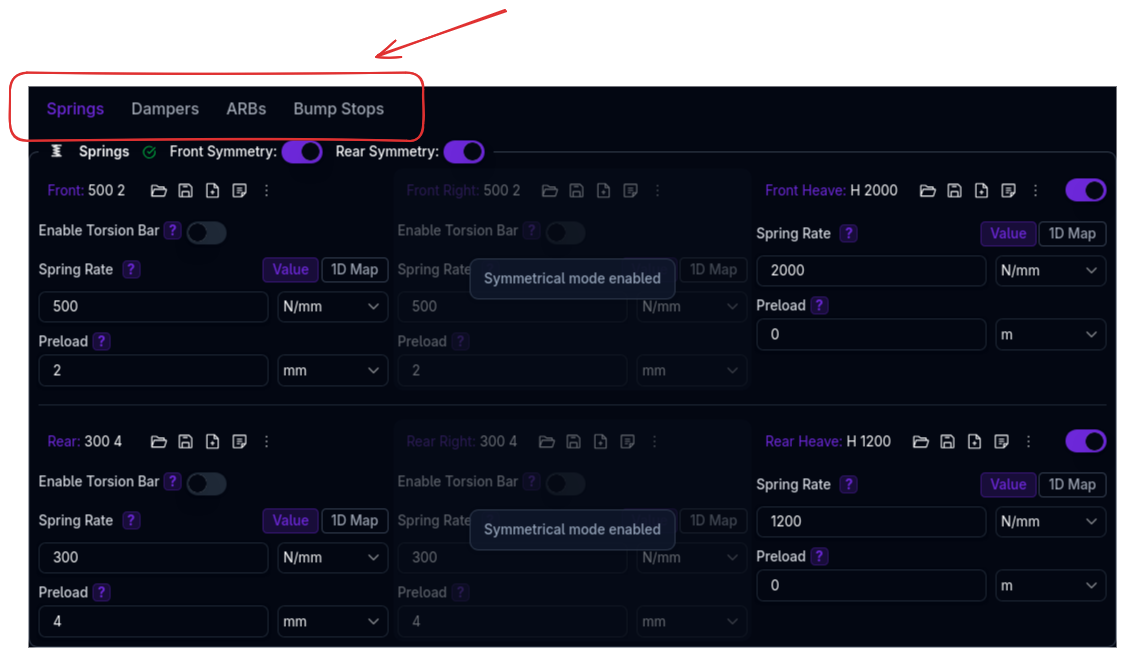
The Suspension page uses a tabbed layout to organize subsystems:
| Tab | Contents |
|---|---|
| Springs | Corner springs (left/right) and optional heave springs |
| Dampers | Corner dampers (left/right) and optional heave dampers |
| ARBs | Anti-roll bars (one per axle, optional) |
| Bump Stops | Corner bump stops (left/right) and optional heave bump stops |
Each tab shows both the front and rear axle side by side. Within each axle, left and right corners are displayed as separate fieldsets.
Axle and Corner Structure
Each axle (front and rear) has:
- Left corner — independent spring, damper, and optional bump stop
- Right corner — independent spring, damper, and optional bump stop
- Shared components — ARB and heave system apply to the full axle
Symmetry Toggles
Each component type has a symmetry toggle per axle. When symmetry is enabled, left-side values are automatically mirrored to the right side. This is the default for most setups.
Symmetry
Use symmetry for symmetric setups (most production and race cars). Disable symmetry only when you need deliberately different left/right settings, such as oval-track configurations.
Heave System
The heave system is an optional subsystem toggled independently for each axle. When enabled, it adds:
- Heave spring — a third spring acting on average wheel displacement
- Heave damper — a third damper acting on average wheel velocity
- Heave bump stop — a bump stop on the heave system
Heave systems are commonly used in Formula-style cars and prototypes to control pitch and heave independently from roll. The heave system requires a 3rd spring pickup point to be defined in Kinematics.
Suspension Metrics Panel
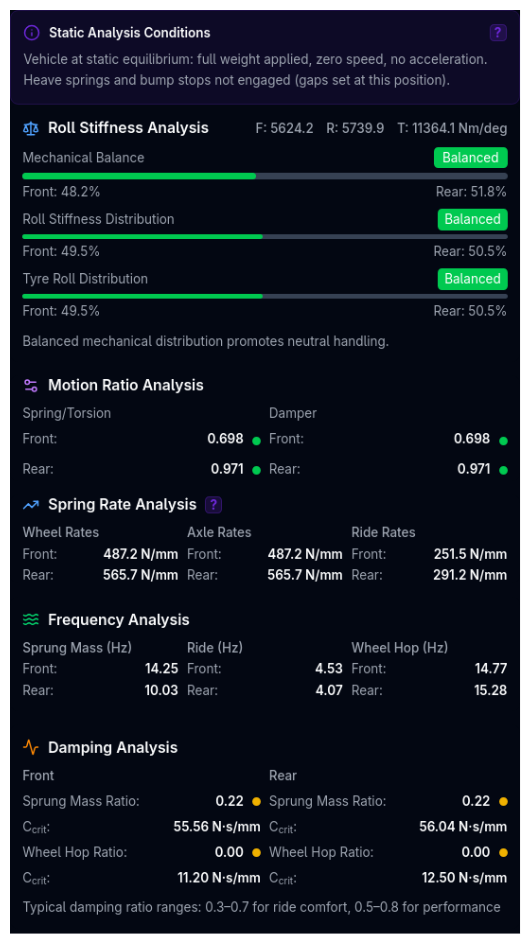
The right-hand column of the Suspension page displays a Suspension Metrics panel that calculates and shows derived vehicle properties based on your current suspension configuration. These metrics update automatically when you save changes.
Roll Stiffness Analysis
- Mechanical Balance — front/rear distribution of roll stiffness accounting for both suspension and tyre contributions. A balanced setup (45–55%) promotes neutral handling; front-biased can cause understeer on corner entry, rear-biased can cause oversteer.
- Roll Stiffness Distribution — front/rear split of suspension roll stiffness alone.
- Tyre Roll Distribution — front/rear split of tyre roll stiffness.
Motion Ratio Analysis
Displays the spring and damper motion ratios for front and rear axles, with status indicators (Low / Optimal / High).
Spring Rate Analysis
- Wheel Rates — effective stiffness of the spring at the wheel, accounting for the motion ratio.
- Axle Rates — total vertical stiffness at the axle, including springs and anti-roll bars.
- Ride Rates — combined stiffness of suspension and tyres in series, which determines the vehicle's dynamic response and ride frequencies.
Frequency Analysis
- Sprung Mass Frequencies — natural frequencies of the body (front and rear).
- Ride Frequencies — natural frequencies including tyre compliance.
- Wheel Hop Frequencies — unsprung mass natural frequencies.
Damping Analysis
- Sprung Mass Damping Ratio — ratio of actual damping to critical damping for the body. Typical ranges: 0.3–0.7 for ride comfort, 0.5–0.8 for performance.
- Wheel Hop Damping Ratio — damping ratio for unsprung mass oscillations.
- Critical Damping (C_crit) — the critical damping coefficient for reference.
Unsaved Changes
If you have unsaved suspension changes, the metrics panel will show a warning indicating that calculations may not reflect your latest edits. Save your changes to update the metrics.
Validation Warnings
The suspension validates the overall system configuration. Subsystem-specific warnings are documented on each component's page. The parent suspension level checks composite properties that depend on multiple components together.
Motion Ratio Warnings
| Condition | Warning |
|---|---|
| Spring motion ratio < 0.3 | Very low motion ratio |
| Spring motion ratio > 2.0 (non-torsion bar) | Very high motion ratio |
Wheel Rate Warnings
| Condition | Warning |
|---|---|
| Wheel rate < 15 N/mm | Low wheel rate |
| Wheel rate > 300 N/mm | High wheel rate |
Side Matching Warnings
| Condition | Warning |
|---|---|
| Left/right spring rates differ by > 1000 N/m (or Nm/rad) | Mismatched spring rates |
| Left/right damping coefficients differ by > 1000 Ns/m | Mismatched damping coefficients |
Subsystem Pages
- Springs — Linear springs, torsion bars, heave springs
- Dampers — Corner dampers and heave dampers
- Anti-Roll Bars — Roll stiffness distribution
- Bump Stops — Progressive rate bump stops