Setup Selector
The Setup Selector is your hub for managing and switching between different saved setups. Think of it as your setup library - a quick way to browse, search, and load any configuration you've previously saved.
Overview
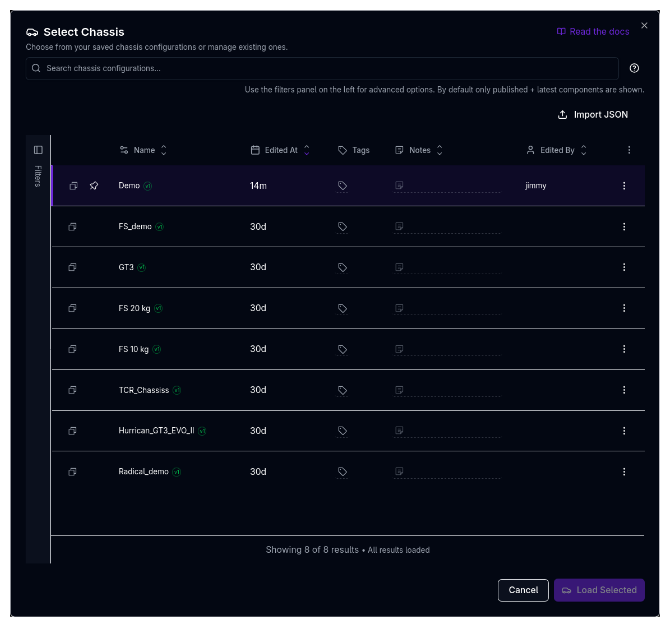
When you open the Setup Selector, you'll see a table view of all saved components under the current component type. The interface consists of:
Header Bar
- Search input - Filter by setup name, tag names, or note content
- Help icon - Shows keyboard shortcuts for selection and loading
- Active filter chips - Display current filters with quick remove buttons
Command Bar
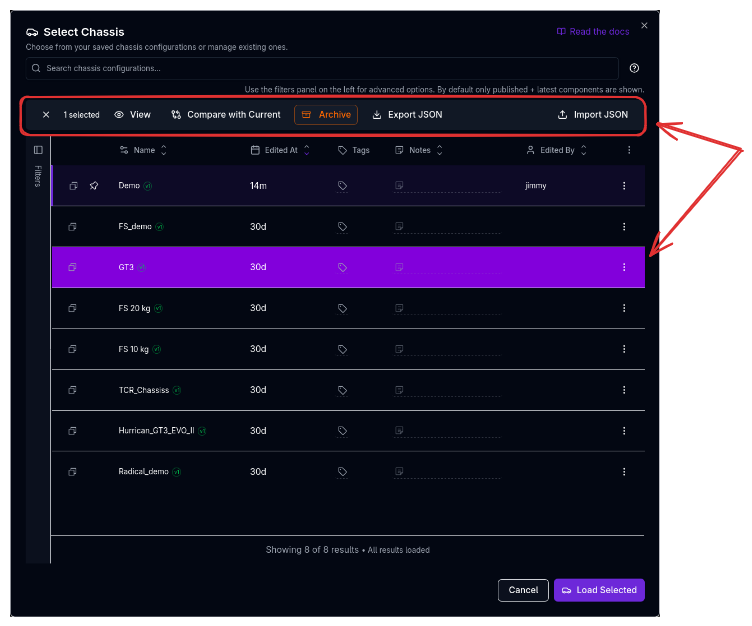
Always visible at the top of the table area, the command bar shows:
- Selection count - When items are selected (e.g., "2 selected")
- Clear selection - Button to deselect all items
- View - View full details of a single component
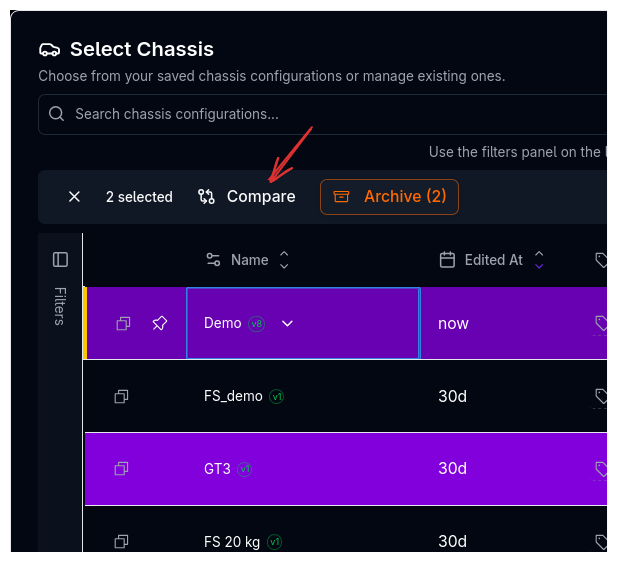
- Compare - Compare two or more selected components
- Compare with Current - Compare selected item against currently loaded setup
- Archive - Archive selected items (orange button)
- Lock / Unlock - Lock or unlock every selected component in one click, preventing new versions being saved over them
- Export JSON - Export selected component as JSON file
- Export JSONs - Export several selected components together as a single zip file
- Import JSON - Import one or more components from JSON files
Filters Sidebar
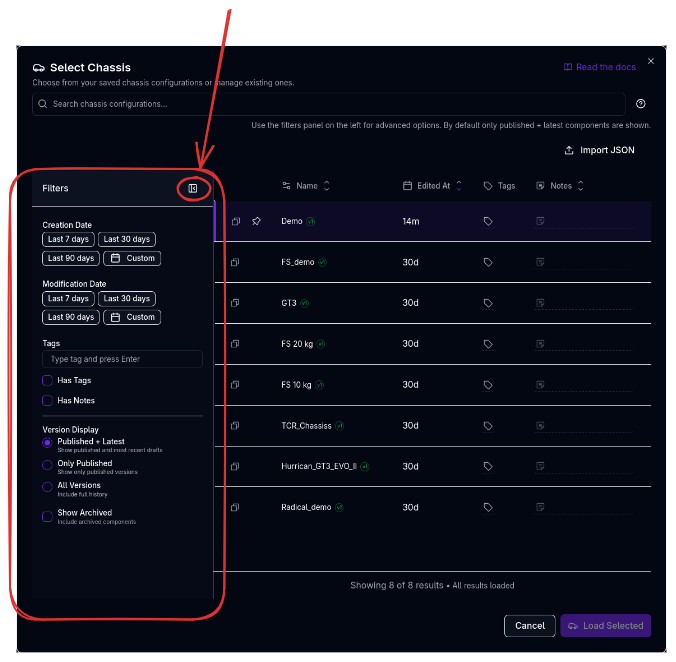
Collapsible sidebar on the left with advanced filtering options:
- Creation Date - Quick filters (Last 7/30/90 days) and custom date range
- Modification Date - Quick filters and custom date range
- Tags - Add/remove tags and filter by "Has Tags"
- Has Notes - Filter for setups with or without notes
- Version Display - Published + Latest, Only Published, or All Versions
- Archive Status - Active (default, hides archived), Include Archived (shows both), or Archived Only (shows just archived components)
Table View
Each entry displays:
- Actions column - Duplicate, Restore (archived), View, Compare, Archive, Export
- Name - The setup name with ID badge showing version number
- Edited At - When the setup was last modified
- Tags - Labels for organization (inline editable)
- Notes - Documentation or comments (inline editable)
- Edited By - Team member who last modified it
The currently active setup is highlighted with a left border accent and pin icon.
Resizing Columns
Drag the divider between any two column headers to resize a column; the new width is saved and persists across page reloads. Double-click a divider to reset that column to its default width.
Choosing Which Columns to Show
The Columns button opens a column visibility menu for toggling Edited At, Tags, Notes, Edited By and Bundle on and off. Name always stays visible. Your choices are remembered between sessions, alongside the column widths.
Loading a Setup
To switch to a different setup:
- Click on the setup you want to load (it will highlight in purple)
- Click the "Load Selected" button in the footer
- The component will update with the selected configuration
Alternatively, double-click a setup to load it immediately and close the dialog.
Quick Load
Double-click any row to load it instantly without needing to click "Load Selected".
Mixing Components From Different Vehicles or Templates
Setup Selection happens per component, not per vehicle. A component you load (springs, tyres, aero, etc.) isn't locked to the vehicle or template it was originally created on — you can load a suspension setup from one template car and a tyre model from another onto the same vehicle. To combine values from two different vehicles (for example, mixing values from a TCR template with a GT3 template), open the Setup Selector for the specific component you want to change — either from its page or by clicking its folder icon in the Tree View — and load the version that came from the other vehicle/template.
Version History
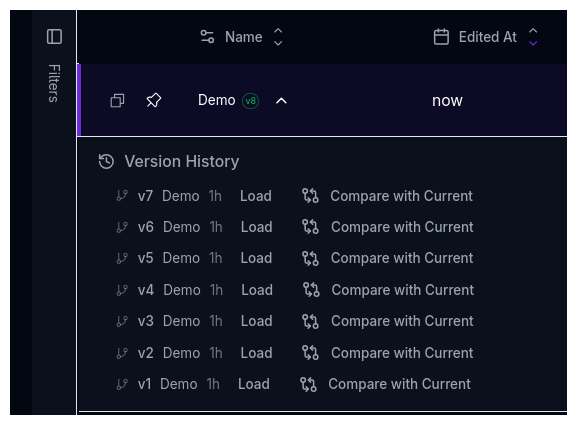
Setups that have previous versions show an expand button next to their name. Click it to reveal the version history, showing older versions with their published status and timestamps.
Version rows use the same selection model as normal setup rows. Click a version to select it, then use the command bar at the top of the table to view, compare, or load the selected item. You can also click Load on a historical version row to load that version directly.
History is loaded a page at a time. Components with long histories show a Load more control to fetch the next page — previously anything past the 100th version was silently unavailable. A search box also lets you jump straight to a known version number instead of paging through.
Tag Management
Tags help you organize and categorize your setups for easy retrieval.
Adding Tags
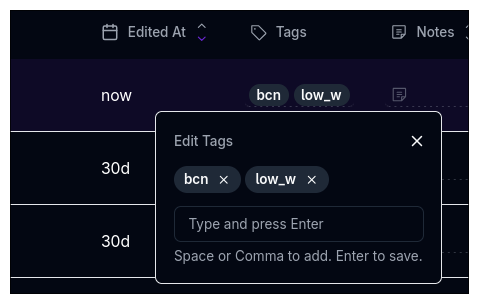
- Click the tag cell next to a setup in the table
- Type the tag name (e.g., "race", "qualifying", "wet weather")
- Press Enter to save
Adding Multiple Tags
Separate tag names with commas to add several at once:
Using Tags
Tags make it easy to:
- Group similar setups together
- Find setups for specific conditions
- Filter by track, weather, or tyre compound
- Organize team workflows
Tag Naming
Use consistent tag names across your team for better organization. Consider creating a tagging convention like "track-name", "condition", "purpose".
Multi-Select Operations
Selecting Multiple Setups
You can select multiple setups using:
- Click - Select a single item
- Ctrl+Click (Cmd+Click on Mac) - Add individual items to selection
- Shift+Click - Select a range of items
A command bar appears at the top showing how many items are selected, with a clear button and bulk actions.
Duplicating a Setup
Click the copy icon on any row to duplicate that setup. This creates an exact copy that you can then rename and modify.
Archiving Setups
Archiving replaces permanent deletion, allowing you to clean up your setup list while keeping the ability to restore items later.
To archive setups:
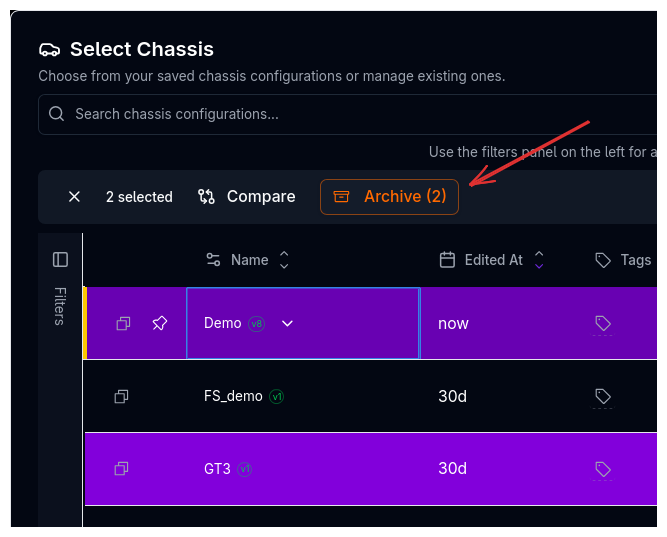
- Select one or more setups
- Click the archive icon (orange) in the command bar
- Confirm the archive operation
Archiving vs Deleting
Archived setups are hidden from the default view but can be restored at any time. Set the Archive Status filter to Include Archived or Archived Only to view and restore archived setups.
Restoring Archived Setups
- Open the Filters sidebar and set Archive Status to Include Archived or Archived Only
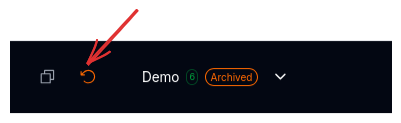
- Archived setups appear with an "Archived" badge
- Click the restore icon on any archived setup to unarchive it
Searching and Filtering
The Setup Selector includes powerful search and filtering capabilities.
Basic Search
Type in the search bar to filter by setup name, tag names, or note content.
Advanced Filters
Click the Filters button in the sidebar to open the advanced filters panel with the following options:
Date Filters
- Creation Date - Filter by when the setup was originally created
- Modification Date - Filter by when the setup was last edited
Quick date buttons: Last 7 days, Last 30 days, Last 90 days
Custom date range using the calendar picker.
Tags Filter
- Tag input - Type and press Enter to add tags
- Has Tags checkbox - Only show setups that have at least one tag
Notes Filter
- Has Notes checkbox - Only show setups with notes
Version Display Filter
- Published + Latest (default) - Show published and most recent drafts
- Only Published - Show only published versions
- All Versions - Include full version history
Archive Status
- Active (default) - Hide archived components
- Include Archived - Show both active and archived components
- Archived Only - Show only archived components
Active filters are shown as chips below the search bar. Click the X on any chip to remove that filter, or click Clear All to reset everything.
Filter Persistence
Your filter settings are saved per component type. When you reopen the Setup Selector, your previous filters are automatically restored.
Default View
By default, only published components and the latest version of each component are shown. Use the advanced filters to see all versions or archived items.
Sorting
Click any sortable column header to sort by that field. Click again to toggle between ascending and descending order. Sort indicators appear next to the column name.
Comparison Features
View Single Component
Select a single item and click View to see all fields and details in a comparison view.
Compare Two or More
Select multiple items and click Compare to open the comparison view showing differences between setups.
Historical versions can be selected and compared the same way as current rows, so you can compare an older version against the latest setup or against another selected version.
Compare with Current
When a different setup is selected, you can compare it against the currently loaded setup to see what has changed.
Import and Export
Export as JSON
Select a single setup and click Export JSON to download the component data as a JSON file. This can be used for backup or to share setups externally.
Select two or more setups and the command bar offers Export JSONs instead, which downloads them together as a single zip file. Large selections are sent in batches of 100 automatically, and a progress indicator shows how far through the batch you are. Any component that could not be exported is recorded in the zip's manifest rather than failing the whole download.
Import from JSON
Click Import JSON and select one or more JSON files. Before anything is saved, a preview step lets you confirm or edit the name each component will be given. When importing several files at once, you can choose whether names come from the name stored inside each file or from the file name itself — useful when files have been renamed by hand and the two disagree.
Each item is imported independently, so one invalid file does not roll back the rest. A per-item report afterwards shows exactly which imports succeeded and which failed.
Common Workflows
Organizing Setups by Track
- Add track name as a tag to each setup (e.g., "silverstone", "spa")
- Use the tag filter in the sidebar to filter by track
- Quickly compare different configurations for the same track
Finding Recent Changes
- Open the filters sidebar
- Set the modification date to "Last 7 days" or custom range
- Review what your team has been working on
Cleaning Up Old Setups
- Sort by "Edited At" column
- Use Shift+Click to select old setups
- Archive outdated configurations (they can be restored if needed)
ID Badge
Each setup name is accompanied by an ID badge showing the version number:
| Visual | Meaning |
|---|---|
| Green text/border | Latest component |
| Orange text/border | Not Latest component |
| "A" suffix | Archived component |
Hover over the badge to see full metadata including:
- Version number
- Whether it's the latest version
- Archived status
- Created date and time
- Last modified date and time
- Who edited it
Next Steps
- Learn about the Setup Command Palette for managing individual setups
- Explore Getting Started to create your first setup
- Read about User Settings to customize your experience