Setup Command Palette
The Setup Command Palette is your primary interface for managing and interacting with vehicle components. It appears at the top of each component page and provides quick access to essential actions.

Overview
The Setup Command Palette contains the following controls, from left to right:
Component Name
Click on the component name to edit it inline. This allows you to give descriptive names to different setups. The component title (e.g., "Front Left", "Rear") is shown as an abbreviated prefix in purple, and positional titles are shortened to save space (e.g., "FL", "RR", "F Heave").

When you click the name, it switches to an input field. Press Enter or click the checkmark to save, or click the X to cancel.
Unsaved Changes Indicator
If you've edited the component name, it will be highlighted in yellow to indicate unsaved changes.
ID Badge
Next to the component name, you'll see an ID badge showing the component's version number. The badge displays version status through color coding:
| State | Visual Indicator |
|---|---|
| Latest | Green border and text |
| Not Latest | Orange border and text |
| Latest version | Shows "Yes" in tooltip |
| Older version | Shows "No" in tooltip |
| Archived | An "A" suffix appears after the version number |
For example, a badge showing v42 in green indicates a latest component. An outdated component shows v38 in orange.
![]()
Hover over the badge to see full details including version status, archived status, creation and modification dates, and who last edited it.
Folder Icon (Setup Selector)
Opens the Setup Selector to browse, search, and load any saved setup for this component type.
Save Icon
Saves any changes you've made to the component. A yellow dot appears on the save icon when there are unsaved changes.
- Parameter changes: A new version of the component is created, and the previous version is preserved in history.
- Metadata-only changes (notes, tags, hidden/archived): Applied directly to the current version without creating a new one.

Save As Icon
Opens the Save As dialog, which creates a new version of the component. This resets the version to v1 and makes it visible in the file viewer by default.
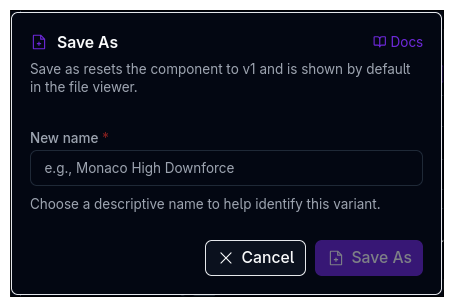
Save As vs Save
Use Save for quick updates to an existing component. Use Save As to create a new branch/variant with a different name.
Overflow Menu (•••)
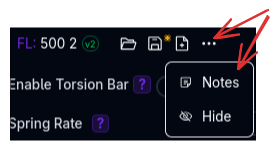
Opens additional options:
- Notes - Add notes and comments to the component. A blue dot appears on the overflow button when notes exist.
- Hide/Show - Toggle component visibility for other team members.
Notes
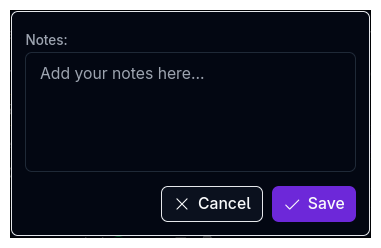
Click Notes in the overflow menu to open a text area where you can document setup decisions, test results, or future modifications. Click Save to persist the notes to the current component version, or Cancel to discard changes. Saving notes does not create a new version.
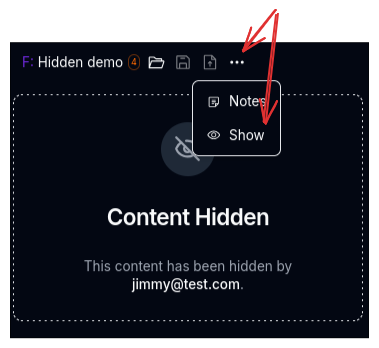
Hiding Components
Hiding a component completely removes it from view for other team members. Use this to:
- Keep experimental setups private
- Hide work-in-progress configurations
- Maintain a clean workspace for your team
When a component is hidden, the hide button changes to a Show button to restore visibility. While hidden, the save actions are disabled.
Unsaved Changes Protection
The Setup Command Palette protects you from accidentally losing work:
- Route navigation - If you try to navigate away with unsaved changes, a confirmation dialog asks whether to stay or leave without saving.
- Browser close/refresh - The browser will prompt you before closing or refreshing if there are unsaved changes.
Common Workflows
Creating Setup Variations
- Open the component you want to vary
- Make your changes
- Click the Save As icon
- Give it a descriptive name (e.g., "Spa Wet Setup")
- Click Save As - your original setup remains unchanged as a separate version
Iterating on a Setup
- Make changes to your component
- Click the Save icon to update the current version
- The previous version is preserved in version history
Documenting Changes
- Click the overflow menu (•••) then Notes
- Document what you changed and why
- Click Save
Notes are saved directly to the current version without creating a new one, keeping version history focused on parameter changes.
Next Steps
- Learn about the Setup Selector for managing multiple setups
- Explore the Navigation Bar for accessing different sections
- Read about User Settings to customize your experience