File Viewer
The File Viewer is your central hub for browsing, organising, and managing all simulation results and uploaded telemetry. It provides a folder-based file system with search, filtering, sorting, and bulk operations — making it easy to find the right result and load it onto the simulation desk for analysis.
Overview
Every simulation you run and every telemetry file you upload is stored as a result file in the File Viewer. Files are organised in a folder hierarchy that you create and manage, similar to a desktop file explorer. From here you can:
- Browse results in a folder tree with breadcrumb navigation
- Search across all files by name
- Filter by track, vehicle, lap time range, or simulation type
- Sort by any column (name, lap time, date, status, etc.)
- Select files to stage in the Staging Area, move, rename, delete, or compare
- Upload telemetry data from external logging systems
How Racing Teams Use It
- Session management — Create folders for each test day, event, or development phase to keep results organised
- Quick retrieval — Use filters and search to find a specific run from hundreds of results
- Staging — Select results and add them to the Staging Area for viewing in the Trace View or Metrics page
- Setup recreation — Recreate the exact vehicle setup that produced a result, useful when revisiting an earlier configuration
- Comparison — Select multiple results and compare their vehicle configurations side by side
- Bulk operations — Move, rename, or delete multiple files at once to keep the workspace tidy
Navigating the File Viewer
Folder Structure
The File Viewer uses a folder hierarchy. Double-click a folder to open it, and use the breadcrumb trail at the top to navigate back up to any parent folder.
- Click any segment in the breadcrumb to jump directly to that folder
- Click the New Folder button (folder icon with plus) to create a subfolder in the current location
Search

Use the search bar at the top to find results by name across all folders. Type your query and press Enter to search. The breadcrumb trail changes to "Search Results" while a search is active. Clear the search to return to folder browsing.
Filtering

The filter bar below the breadcrumb provides targeted filtering options:
| Filter | Description |
|---|---|
| Track | Show only results for a specific track (populated from your available tracks) |
| Vehicle | Show only results for a specific vehicle configuration |
| Lap Time | Set a minimum and/or maximum lap time range to narrow results |
| Simulation Type | Show only a specific type (Lap Time, Sweep, Straight Line, Cornering, Ride, Handling (YMD), Kinematics, or Uploaded) |
| User | Show only results launched by a specific team member — the dropdown shows each member's avatar and display name, and is searchable |
Each filter has a clear button to remove it individually, and a Clear All option resets all filters at once. Filters apply within the current folder.
Sorting
Click any column header to sort the table by that column. Click again to reverse the sort direction (ascending/descending), and a third click removes the sort. The active sort column is highlighted with a directional arrow.
The default sort is by Created date (newest first).
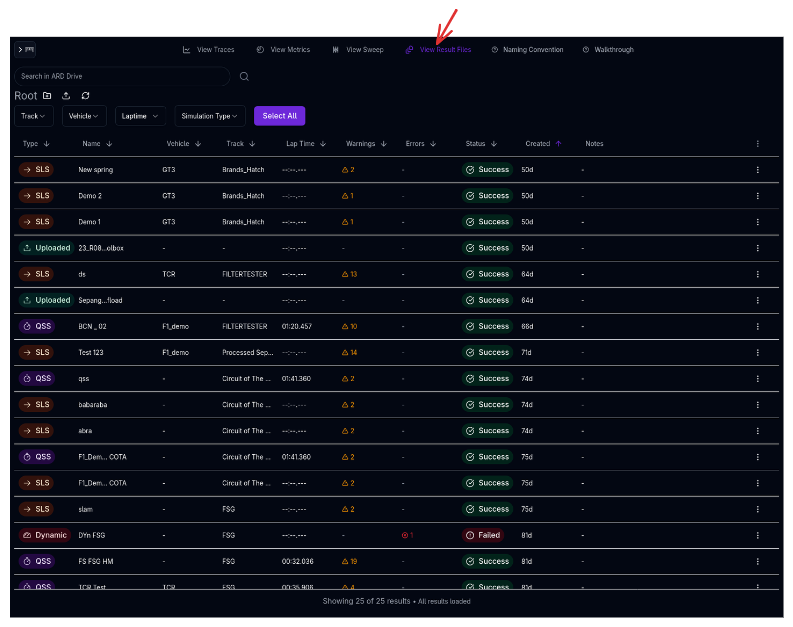
The Results Table
The table displays one row per file or folder with the following columns:
| Column | Description |
|---|---|
| Type | Simulation type icon and label (Lap Time, Sweep, Straight Line, Cornering, Ride, or Uploaded) |
| Name | File or folder name. Names in bold indicate files currently loaded in the Staging Area |
| Vehicle | The vehicle configuration used for this simulation |
| Track | The track used (hover to see the full name if truncated) |
| Lap Time | The simulation lap time, formatted as mm:ss.sss |
| Warnings | Warning count with hover card showing details grouped by category |
| Errors | Error count with hover card showing error messages |
| Status | Simulation status — completed, in progress (with spinner), failed, or queued |
| Created | Date the result was created (hover to see the full timestamp) |
| Ambient | Ambient conditions setup used for the simulation (temperature, pressure, wind). Hidden by default — toggle on via the column visibility menu |
| Notes | Simulation notes or sweep configuration summary (hover to see full details) |
Selecting Files
Click a row to select it. Selected rows are highlighted in purple.
| Action | Behaviour |
|---|---|
| Click | Select a single row (deselects others) |
| Ctrl/Cmd + Click | Toggle a row's selection without affecting others |
| Shift + Click | Select a range from the last selected row to the clicked row |
| Select All | Button above the table selects all files in the current folder |
| Escape | Clears all selections |
The Command Bar
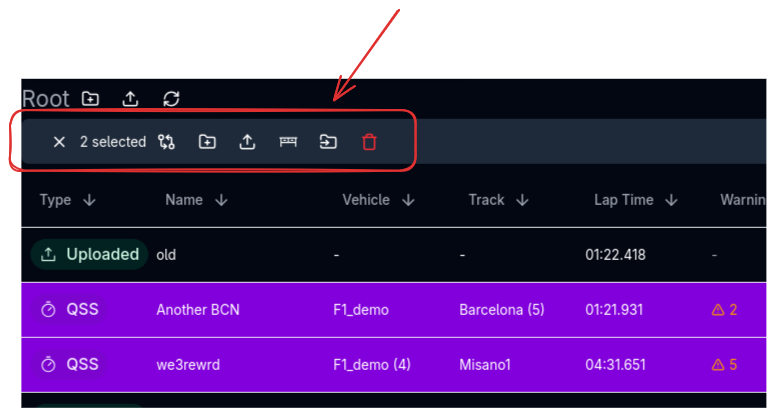
When one or more rows are selected, the filter bar is replaced by a command bar showing the selection count and available actions:
| Action | Description |
|---|---|
| Compare | Open the vehicle configuration comparison view (see below) |
| New Folder | Create a new folder in the current location |
| Upload | Open the telemetry upload dialog |
| Stage Sim | Load the selected files into the Staging Area for analysis |
| Download | Download selected files as a zip (works for folders and multi-file selections) |
| Rename | Rename the selected item (single selection only) |
| Move | Move selected items to a different folder |
| Delete | Delete selected files and/or folders with confirmation |
File Actions
Staging Results
The Staging Area is the workspace where you load results for analysis. There are two ways to stage files:
- Double-click a file to toggle it in/out of the Staging Area
- Select files and click the Stage Sim button in the command bar
Staged files are shown with their name in bold in the file viewer. Once staged, switch to the Trace View, Metrics, or Parallel Coordinates pages to analyse them.
Exporting Results
Hover over any file row to reveal the Download button (download icon). Click it to export all data channels for that result as a file for external analysis. To download multiple files or an entire folder at once, select them and click the Download button in the command bar — everything is packaged into a named zip file.
Recreating a Vehicle Setup
Hover over a file row to reveal the Recreate Setup button (plus + car icon). This creates a new vehicle configuration that exactly matches the setup used when the simulation was run. This is useful when:
- You want to return to a previous configuration after making changes
- You want to use a known-good setup as a starting point for further development
Moving Files
Select one or more items and click Move to open the move dialog. Navigate the folder hierarchy using breadcrumbs, then confirm the destination. The system prevents circular moves (you cannot move a folder inside itself or its children). After moving, a toast notification shows the exact destination path — for example, "Moved folder 'Q1 Setup' into Root/Event 2026/Silverstone".
Renaming
Select a single item and click Rename to change its name. The dialog shows the current name and lets you type a new one.
Deleting
Select items and click Delete to remove them. A confirmation dialog appears before deletion.
Folder Deletion
Deleting a folder also deletes all files and subfolders inside it. This cannot be undone.
Comparing Configurations

Select one or more results and click the Compare button to open the vehicle configuration comparison view. This is covered in detail on the Vehicle Compare page.
When comparing multiple results, the view highlights only the differences between configurations, making it easy to spot what changed between runs.
Warnings and Errors
Warnings
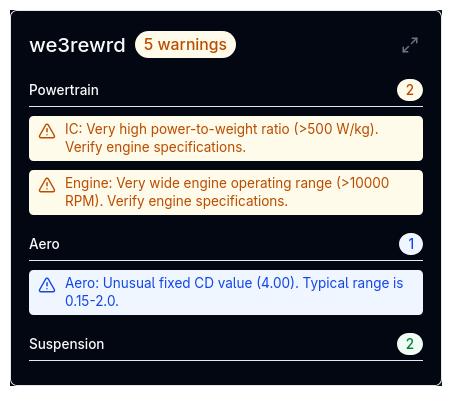
The Warnings column shows a count of simulation warnings. Hover over it to see a summary grouped by category (Powertrain, Suspension, Brakes, Tyres, etc.). Click the expand button to open a full-screen view with all warning details.
Warnings indicate situations where the simulation completed but encountered conditions worth reviewing — for example, a tyre operating beyond its validated slip angle range, or a bump stop that engaged unexpectedly.
Errors
The Errors column shows a count of simulation errors. Hover to see the error messages. Errors indicate conditions that prevented part of the simulation from completing normally.
Infinite Scroll
The file viewer loads results in pages as you scroll. A status bar at the bottom shows how many results are loaded out of the total (e.g., "Showing 50 of 237 results"). Scroll down to load more automatically.
When using Select All, the system loads all remaining pages before selecting, ensuring every file in the folder is included.
Tips & Best Practices
Organise by Event
Create a folder structure that mirrors your testing calendar — for example, a top-level folder per event, with subfolders for each session (Practice, Qualifying, Race setup). This makes it easy to find results months later.
Use Notes
Add notes when running simulations to record why you ran them and what you expected. The notes appear in the file viewer and make it much easier to understand old results when you revisit them.
Double-Click to Stage or Drag to Stage
The fastest way to view a result is to double-click it in the file viewer or drag it into the Staging Area. This stages it and you can immediately switch to the Trace View or Metrics page.
Recreate Setup for Baseline
Before making experimental changes, use Recreate Setup on your current best result to create a snapshot of the configuration. This gives you a clean baseline to return to if the experiment does not improve performance.
Filter by Lap Time Range
When reviewing a large number of sweep results, use the lap time filter to hide outliers and focus on the competitive window. This is faster than sorting and scrolling through hundreds of rows.
Related Topics
- Trace View — Analyse simulation results with interactive plots
- Metrics — View summary metrics across multiple results
- Parallel Coordinate Plots — Explore sweep results visually
- Vehicle Compare — Compare vehicle configurations between results
- Results Upload — Upload telemetry data from external logging systems