ARD + HH Data Management Integration
This guide walks you through connecting HH Data Management (HHDM) to ARD so you can run simulations directly from HHDM. No prior coding or terminal experience is required — every step is spelled out below.
What you'll end up with
A working connection between HHDM and ARD, so HHDM can trigger simulations on ARD and pull back results automatically.
Step 1 — Create your ARD API key
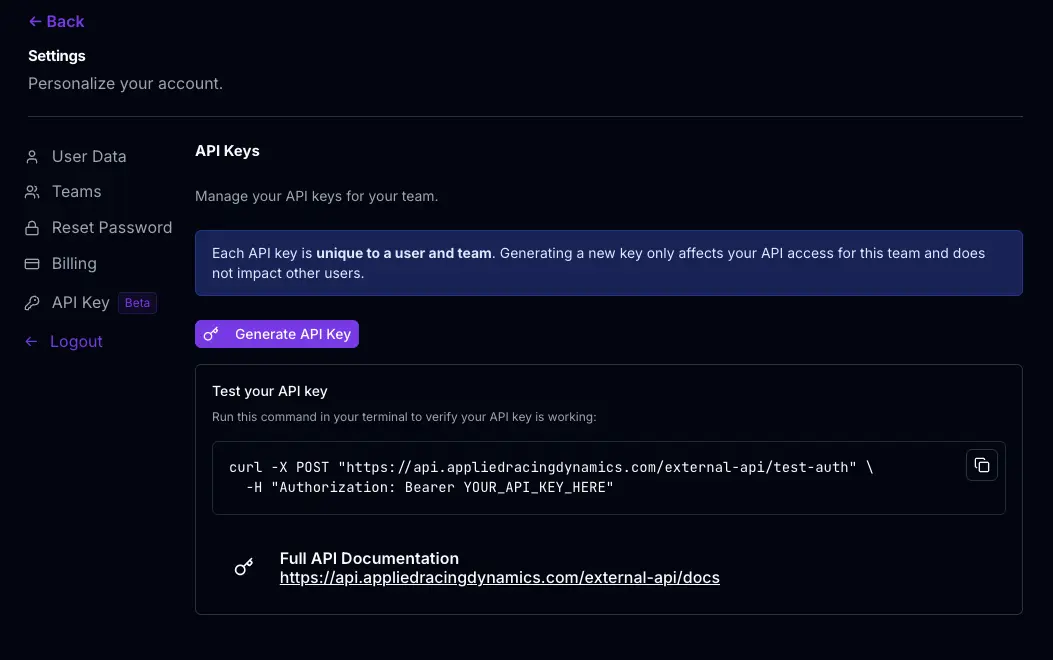
- Log in to ARD.
- Go to User Settings → API Access.
- Click Generate Key.
- Copy the key immediately — ARD only shows it once. If you lose it, you'll need to generate a new one.
Step 2 — Add the key to HHDM
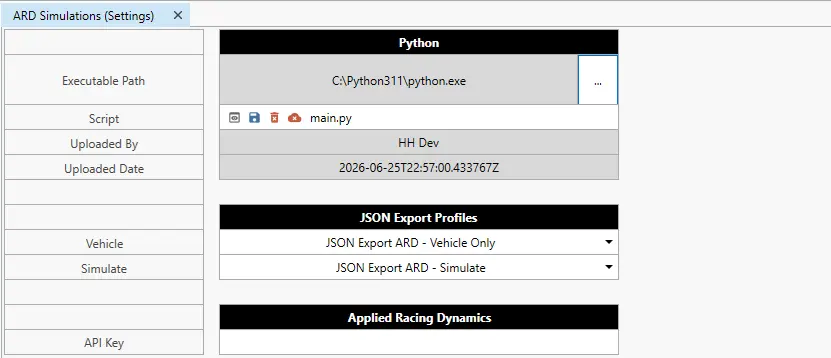
- Open HHDM and go to its ARD Simulation Settings page.
- Paste the API key into the API Key field.
- Save.
Keep your key private
Treat this key like a password. Don't paste it into emails, chat messages, or shared documents. If you think it's been exposed, go back to ARD and generate a new one — this instantly disables the old key.
Step 3 — Install Python using UV
HHDM needs a small Python "connector" script to talk to ARD. To run that script, your computer needs Python installed. We recommend installing it using UV, a simple installer that handles everything for you.
- Download and install UV from the official site: https://docs.astral.sh/uv/getting-started/installation/
- Follow the instructions for your operating system (Windows, Linux or Mac).
- Once installed, you'll use it to set up a project folder — a self-contained space that keeps this Python setup separate from anything else on your computer.
Create your project folder
- Create a new folder somewhere easy to find, e.g.
Documents/ard-hhdm-connector. - Open a terminal window in that folder:
- Open the folder in File Explorer.
- Click into the address bar at the top of the window (where the folder path is shown).
- Type
cmdand press Enter — a terminal window opens, already inside your folder.
- Open Terminal (press
Cmd + Space, type "Terminal", press Enter). - Type
cd(with a space after it) — don't press Enter yet. - Drag your folder from Finder into the Terminal window. This automatically fills in the folder's path.
- Press Enter.
- In the terminal, run the following commands one at a time, pressing Enter after each:
These commands set up the Python environment and install the one extra piece of software (requests) the connector script needs to talk to ARD over the internet.
Add the connector script
- Ask your ARD contact for the
main.pyfile. - Place
main.pydirectly inside the project folder you just created (the same one you ranuv initin).
Your folder should now contain at least:
Step 4 — Point HHDM at the Python environment
- In HHDM, find the setting for the Python Executable Path.
- Select the Python interpreter that lives inside the project folder you just created (the one
uv initset up — it will typically be in a subfolder called.venvinside your project folder).
Step 5 — Run the authentication check
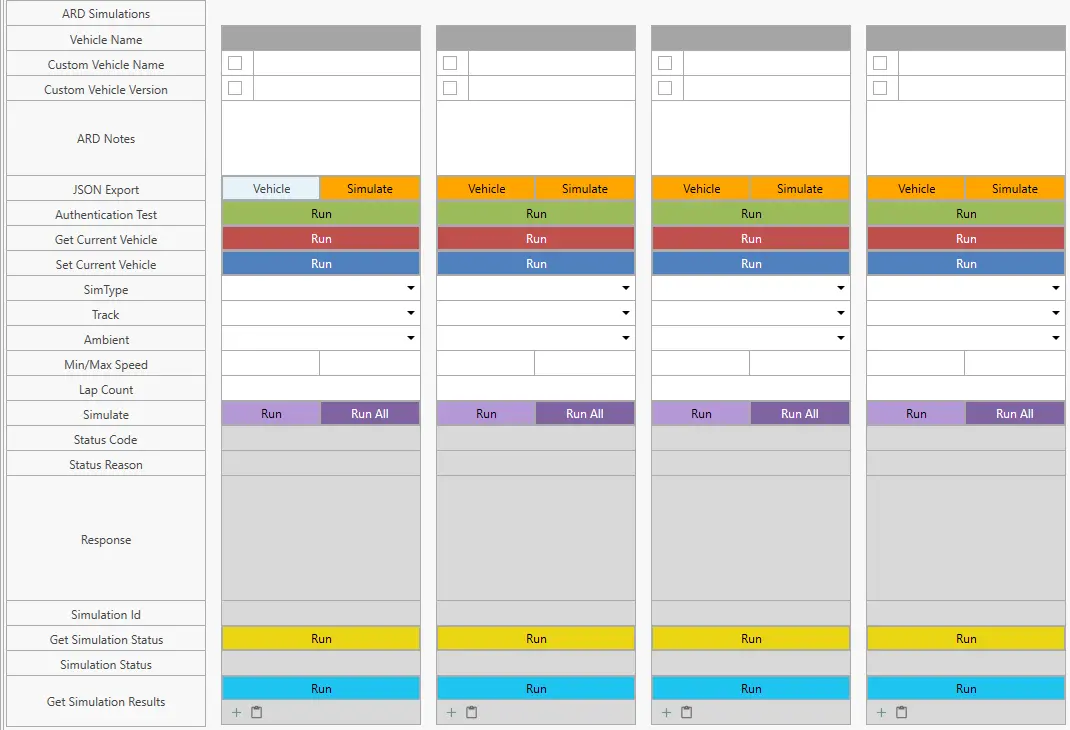
Back in HHDM, run the Authentication Check action.
- ✅ Success means HHDM was able to reach ARD using your API key and the connector script is working.
- ❌ If it fails, double-check:
- The API key was pasted correctly in Step 2
main.pyis in the correct folder- The interpreter selected in Step 4 is the one from your project folder (not your computer's default Python, if it has one)
Step 6 — Run your first simulation
Once the health check passes, you're ready to run a real simulation from HHDM.
Build the JSON profile
Simulations are configured using a JSON Profile that maps HHDM's parameters to the matching items in ARD. Ask your ARD/HHDM contact for a demo JSON profile to use as a starting template — you'll customize it from there. The full schema is documented on the ARD External API docs page.
Every simulation must specify:
- Vehicle
- Ambient conditions
- Sim config
- Track — required for Lap Time and Dynamic Lap Time. Handling (YMD), Ride, Kinematics, Straight Line, Cornering and Vehicle Properties runs do not need one and may omit it.
Names must match exactly
Whatever you put for vehicle, track and ambient conditions must match the name of that item in ARD exactly — including capitalization and spacing. A mismatched name is the most common reason a simulation fails to submit.
This also applies one level down: if your HHDM setup sheet selects a specific spring, torsion bar, or bump rubber, that part must be named identically in ARD for the link to call up the same component. There is no fuzzy matching on part names.
Version numbers are optional
If you don't specify a version number for an item, ARD automatically uses the latest version. Only include a version number if you need to pin a simulation to a specific, older version.
Submit and check results
Once your JSON profile is filled in, run the simulation from HHDM.
- Submit the simulation to ARD by clicking the Simulate -> Run button
- Poll ARD until the simulation completes by clicking Get Simulation Status -> Run
- Pull the results back into HHDM by clicking Get Simulation Results -> Run
Include math channels
Math channels are equations ARD works out on request, so they aren't in the results by default. Name the ones you want in the same request:
Each one comes back in metrics if it's a single number, otherwise in data alongside the raw channels, sample for sample:
{
  "data":    { "vCar": [...], "BalanceF": [48.1, 48.4, null, 47.9] },
  "metrics": { "vCarMax": 82.6, "TopSpeed": 82.6 }
}
A name always resolves to the latest version of that equation, so you get the same numbers the app plots. null means no value at that sample, not zero — whatever reads the data needs to skip those points rather than treat them as 0.
Troubleshooting checklist
| Problem | Likely cause |
|---|---|
| Health check fails | Wrong/missing API key, wrong interpreter selected, or main.py missing from the folder |
| Simulation won't submit | Vehicle/track/ambient/sim config missing or name doesn't exactly match ARD |
| Math channel missing from the results | The result doesn't carry a channel that equation references |
| Math channel request rejected (400) | Its name is already used by a channel or metric on that result |
"Command not found" running uv |
UV wasn't installed correctly — reinstall from the link in Step 3 and restart your terminal |